Hello, fellow kitchen creators! Welcome to the Oven Hi family, where we believe every oven holds the potential for something magical. Today, we’re tackling a question that can make or break your bake: How To Proof Bread In The Oven. We’ve all been there—a chilly kitchen, a stubborn dough that refuses to rise, and the dream of a perfect loaf slowly deflating. But what if I told you the secret to a lofty, airy crumb is already sitting in your kitchen?
Your oven is more than just a place to bake; it’s a versatile companion ready to help you at every stage. Using it to create the perfect warm, humid environment for your dough is a game-changer. Forget wrestling with plastic wrap in a drafty corner. Let’s turn your oven into the ultimate proofing box and get that dough to double in size, every single time.
Why Should You Proof Bread in the Oven Anyway?
Before we dive into the “how,” let’s chat about the “why.” You might be wondering if this is just an extra, fussy step. Honestly, it’s the difference between a good loaf and a great one. Proofing dough on the counter is unpredictable; it’s subject to drafts, changing room temperatures, and humidity levels.
Using your oven for proofing gives you one crucial thing: control.
As our resident baking specialist, Maria Chen, often says, “Consistency is the baker’s best friend. By creating a stable, controlled environment, you’re taking the guesswork out of proofing and giving your yeast the perfect conditions to thrive.”
Here’s what you gain when you learn how to proof bread in the oven:
- Consistent Temperature: Yeast is happiest in a slightly warm environment, typically between 75-85°F (24-29°C). An oven can maintain this sweet spot far better than a kitchen counter.
- Draft-Free Zone: Even a slight breeze can cool the surface of your dough, slowing down yeast activity. An enclosed oven is a perfect sanctuary.
- Increased Humidity: A little moisture in the air prevents a dry “skin” from forming on your dough, which can restrict its rise. We’ll show you how to easily create this steamy paradise.
- Faster Rise Times: In a chilly house, proofing can take forever. The gentle, consistent warmth of an oven can speed things up without compromising the flavor development.
The Ultimate Guide on How to Proof Bread in the Oven
Ready to unlock your oven’s full potential? We’ve got three simple, effective methods that work for almost any oven, from basic models to the latest smart ovens. Pick the one that works best for you and your bake.
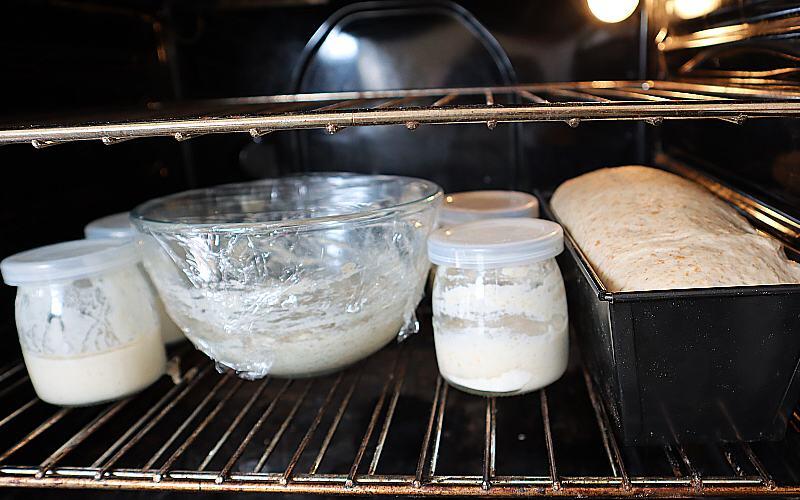
Method 1: The “Oven Off, Light On” Trick (My Personal Favorite)
This is the simplest, most elegant solution, and it’s the one I use most often in my own kitchen. It’s perfect for bakers who want a set-it-and-forget-it approach.
- Prep Your Dough: Place your kneaded dough in a lightly oiled bowl. Cover it with a clean, damp tea towel or plastic wrap to lock in moisture.
- Turn the Light On: With the oven completely off and cool, simply turn the oven light on. Don’t turn on any heating elements!
- Place Dough Inside: Put the bowl of dough on the middle rack.
- Close the Door: Shut the oven door and let the magic happen. The small amount of heat generated by the oven light bulb is often enough to create an environment that’s a few degrees warmer than your kitchen, hitting that 75-85°F (24-29°C) sweet spot.
- Check on It: Let the dough proof according to your recipe’s instructions, typically 60-90 minutes for the first rise, or until it has doubled in size.
Method 2: The Warm Water Bath Method
What if your oven light doesn’t generate enough heat, or you have a super-efficient LED that stays cool? No problem! This method creates both warmth and humidity, making it incredibly effective.
- Grab a Pan: Find a baking pan or dish that can withstand boiling water—a 9×13 inch metal or glass pan works perfectly.
- Boil Water: Bring a kettle or pot of water to a rolling boil. You’ll need about 4-6 cups.
- Position Your Racks: Place one oven rack in the lowest position and another in the middle.
- Place Pan and Water: Carefully place the empty baking pan on the bottom rack. Pour the boiling water into it. The steam will immediately start to warm and humidify the oven.
- Add Your Dough: Place your covered bowl of dough on the middle rack, directly above the pan of hot water.
- Shut the Door: Close the oven door quickly to trap the steam and heat. Crucially, ensure the oven remains off.
- Monitor the Rise: This steamy environment is very efficient, so your dough may rise a bit faster than usual. Check it after about 45-60 minutes.
Method 3: Using Your Oven’s “Proof” Setting
If you have a modern oven, you might just have an “easy button” for this whole process. Many new models, including those from our friends at Oven Hi, come with a dedicated “Proof” or “Bread Proof” setting.
What is an oven’s proof setting?
An oven’s proof setting is a special low-temperature function designed to maintain the ideal warmth and humidity for rising bread dough. It typically holds the oven at a consistent temperature between 80-95°F (27-35°C), automating the entire process.
Here’s how to use it:
- Consult Your Manual: First, double-check your oven’s manual. Each brand might have slightly different instructions or temperature settings for its proof mode. This is key for E-E-A-T (Experience, Expertise, Authoritativeness, Trustworthiness) in your own kitchen!
- Select the Setting: Turn on your oven and select the “Proof” mode.
- Place Dough Inside: Put your covered bowl of dough on the middle rack. Some manuals suggest adding a pan of warm water on a lower rack to increase humidity, while others don’t require it.
- Let It Do the Work: Close the door and let the oven maintain the perfect environment. The oven will gently cycle low heat to keep the temperature steady.
- Keep an Eye on It: Because this setting is so effective, your dough might rise faster than your recipe suggests. Start checking it about 2/3 of the way through the recommended proofing time.
Pro Tips for Perfect Oven Proofing
You’ve mastered the basics of how to proof bread in the oven, but here are a few extra tips from our test kitchen to ensure flawless results every time.
- Don’t Forget to Cover: Always cover your dough. Whether you use plastic wrap, a damp towel, or a reusable silicone lid, this step is non-negotiable. It prevents a dry crust from forming, which can physically stop your dough from rising to its full potential.
- Know When It’s Ready: Don’t just rely on the clock. The best way to check if your dough is ready is the “poke test.” Gently press a floured finger about half an inch into the dough. If the indentation springs back immediately, it needs more time. If it springs back slowly and leaves a small indent, it’s perfect. If it collapses, it’s likely over-proofed.
- Don’t Accidentally Bake It! This is the most common mistake. Before you start, double and triple-check that your oven is OFF. If you preheated it for any reason, let it cool down completely before using it as a proofing box. A hot oven will kill the yeast.
- Remember the Second Proof: These methods work equally well for the second proof (after shaping the loaf). Simply place your shaped loaf on its baking sheet or in its loaf pan, cover it, and pop it back into your prepared proofing environment.
Frequently Asked Questions (FAQ)
Q: What temperature should an oven be for proofing bread?
A: The ideal temperature for proofing bread is between 75°F and 85°F (24-29°C). An oven’s dedicated “Proof” setting may go slightly higher, up to 95°F (35°C). Avoid temperatures over 100°F (38°C), as this can damage or kill the yeast.
Q: Can I proof dough in an oven that was just used?
A: Yes, but with extreme caution. You must let the oven cool down significantly first. Prop the door open and wait until the interior is just lukewarm to the touch. Placing dough in a hot oven will cook the outside and kill the yeast before it has a chance to rise.
Q: How long does it take to proof bread in the oven?
A: It typically takes 45 to 90 minutes for the first rise, depending on the recipe and the method used. The warm, controlled environment of an oven often speeds up the process compared to proofing at room temperature. Always rely on visual cues (doubled in size) and the poke test over the clock.
Q: What if my oven doesn’t have a light and I don’t want to use boiling water?
A: You can try a “preheat and turn off” method. Turn your oven to its lowest possible temperature for just 1-2 minutes, then immediately turn it off. It should feel barely warm inside. This is riskier, as it’s easy to overheat, but can work in a pinch.
Q: My dough isn’t rising in the oven. What did I do wrong?
A: There could be a few culprits. Your yeast might be old or expired. You might have used water that was too hot, killing the yeast. Or, your oven environment might still be too cool or too hot. Double-check your yeast’s expiration date and ensure your oven is just pleasantly warm, not hot.
Your Oven, Your Baking Partner
Mastering how to proof bread in the oven transforms your appliance from a simple heat source into an active partner in your baking journey. It’s a simple shift that brings consistency, confidence, and beautifully risen bread to your kitchen. So next time you’re ready to bake, remember the hidden power of your oven.
We’d love to hear from you! What’s your favorite method for proofing dough? Do you have any other clever tricks up your sleeve? Share your stories and tips in the comments below and let’s continue baking better, together.