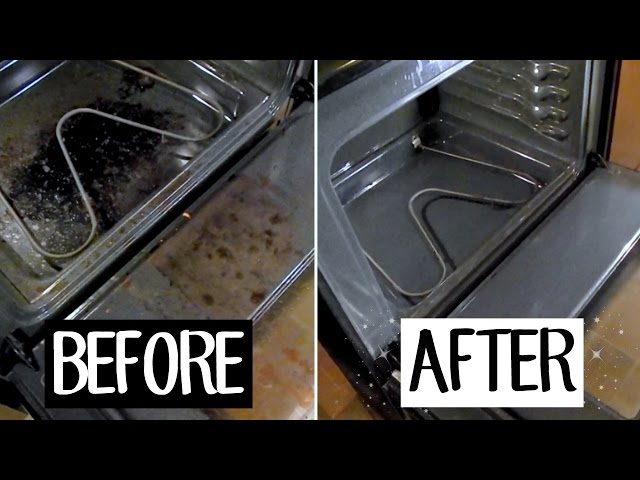
Let’s be real for a moment. We’ve all been there. That glorious, bubbly cheese pizza that dripped, the sweet berry pie that overflowed, or that mystery casserole that left a carbonized fossil on the floor of your oven. You close the door and hope it disappears. But when you preheat for your next baking adventure, that smoky, acrid smell tells you the evidence is still very much there. Figuring out How To Clean The Bottom Of An Oven can feel like a daunting task, but I promise you, it’s easier than you think. As the heart and soul of Oven Hi, I’m here to walk you through it, turning that dreaded chore into a simple, satisfying refresh for the heart of your kitchen.
A clean oven isn’t just about appearances; it’s about performance, safety, and most importantly, the taste of your food. Let’s get that brilliant shine back, so you can get back to creating delicious memories.
Why a Clean Oven Bottom Matters More Than You Think
Before we roll up our sleeves, let’s talk about the “why.” Understanding the benefits can give you that little push of motivation you need. A clean oven isn’t just a happy oven; it’s a better-performing one.
- Better Tasting Food: Burnt-on food and grease can release smoke and carbon fumes as the oven heats up. These can impart a bitter, burnt, or just plain “off” flavor to your delicate cakes, breads, and roasts.
- Improved Efficiency: A thick layer of grime on the bottom element or floor can interfere with heat distribution, making your oven work harder to maintain the correct temperature. A clean oven is an energy-efficient oven.
- Safety First: Large accumulations of grease and food debris are a fire hazard. It’s a rare occurrence, but it’s a risk that’s incredibly easy to eliminate.
- Longer Appliance Lifespan: Regular cleaning prevents corrosive buildup that can damage the interior surfaces and heating elements of your oven over time. Think of it as essential maintenance for your most trusted kitchen partner.
Before You Start: The Prep Work for a Perfect Clean
What’s the secret to any successful kitchen project? Mise en place, or “everything in its place.” Cleaning your oven is no different. A few minutes of prep will make the whole process smoother and safer.
- Ensure the Oven is Completely Cool: Never, ever attempt to clean a warm or hot oven, especially with chemical cleaners.
- Remove Everything Inside: Take out the oven racks, any thermometers, pizza stones, and large pieces of loose debris. You want a completely empty canvas to work with.
- Lay Down Protection: Place old newspapers or paper towels on the floor in front of your oven to catch any drips or spills.
- Ventilate Your Kitchen: Open a window or turn on an exhaust fan. This is important regardless of the method you choose, but it’s absolutely critical if you’re using a commercial oven cleaner.
- Gear Up: Grab some rubber gloves to protect your hands. Safety glasses aren’t a bad idea either, just in case of any splashes.
How to Clean the Bottom of an Oven: Three Fail-Proof Methods
There’s more than one way to tackle a dirty oven bottom. The best method for you depends on how much grime you’re dealing with and what kind of cleaning products you’re comfortable using. Here are my three go-to methods.
Method 1: The Natural DIY Paste (Baking Soda & Vinegar)
This is my personal favorite. It’s effective, incredibly cheap, and uses ingredients you probably already have. It’s the gentle-yet-powerful workhorse of green cleaning.
- Create the Paste: In a small bowl, mix about a half cup of baking soda with 3 to 4 tablespoons of water. You’re looking for a thick, spreadable paste, similar to the consistency of frosting. Adjust the water or baking soda as needed.
- Apply the Paste: Using your gloved hands or a spatula, spread the paste all over the bottom of the oven. Pay extra attention to the really grimy spots. It’s okay if it turns a bit brown on contact with the grease; that means it’s working. Don’t worry about getting it on the heating elements.
- Let It Sit: This is the most important step. Close the oven door and let the baking soda paste work its magic for at least 12 hours, or overnight. Patience is key here; the paste needs time to break down all that baked-on gunk.
- Scrape and Wipe: After it has sat, take a plastic scraper or an old credit card and gently scrape up the loosened grime. You’ll be amazed at how much comes off. Wipe out the loose paste and debris with a damp cloth.
- The Vinegar Rinse: Pour a little plain white vinegar into a spray bottle and spritz it all over the remaining baking soda residue. You’ll see some satisfying fizzing and foaming. This reaction helps lift the last bits of grime.
- Final Wipe-Down: Use a clean, damp cloth to wipe out the oven until it’s completely clean and no residue remains. It might take a few passes. The result is a sparkling clean oven with no harsh chemical smells.
Method 2: The Commercial Oven Cleaner Route
Sometimes, you’re faced with a level of baked-on grime that requires the big guns. Commercial oven cleaners are formulated to cut through the toughest, most carbonized messes with minimal scrubbing.
A Word of Caution: Commercial oven cleaners contain powerful chemicals. It is essential to read and follow the manufacturer’s instructions precisely, wear protective gear, and ensure your kitchen is extremely well-ventilated.
- Prepare the Area: As mentioned in the prep steps, ventilation is non-negotiable here. Open every window you can.
- Spray Generously: Following the product’s directions, spray an even coat of the cleaner on the bottom surface of your oven. Avoid spraying the heating elements, gas valve (in a gas oven), or any fans.
- Wait It Out: Close the oven door and let the cleaner sit for the amount of time specified on the can. This can range from 30 minutes to several hours. Do not turn the oven on.
- Wipe Clean: Once the time is up, use a damp cloth or sponge to wipe away the cleaner and the dissolved grime. You may need to rinse your cloth several times. Make sure you remove all traces of the chemical cleaner to prevent fumes the next time you bake.
Method 3: Using Your Oven’s Self-Cleaning Feature
Many modern ovens, including our beloved Oven Hi models, come with a self-cleaning function. This feature uses extremely high temperatures (around 900°F or 500°C) to incinerate food residue, turning it into a fine ash.
Is the self-clean feature right for this job?
It’s great for an all-over deep clean, but it’s an intense process. For just a few spills on the bottom, a manual clean is often quicker and uses less energy. However, for a seriously dirty oven, it’s a lifesaver.
- Prep for High Heat: Remove absolutely everything from the oven—racks, thermometers, everything. The high heat can warp or damage them. Wipe out any large, loose debris.
- Lock and Load: Start the self-clean cycle according to your oven’s manual. The oven door will automatically lock for safety.
- Ventilate and Wait: The process can take anywhere from 2 to 4 hours. It will produce some smoke and strong odors as the food burns off, so be sure to ventilate your kitchen well.
- Cool Down and Clean Up: Once the cycle is complete and the oven has fully cooled down (this can take another hour or so), the door will unlock. You’ll find a small amount of fine, white ash on the bottom. Simply wipe it out with a damp cloth.
Expert Insight from Chef Isabella Rossi: As a pastry chef with over two decades of experience, Isabella Rossi notes, “A clean oven is a predictable oven. Those burnt bits on the bottom create hot spots and release odors that can ruin a delicate sponge cake. I tell my students that cleaning their oven is as fundamental as sifting their flour.”
What About Those Really Stubborn, Burnt-On Messes?
For those black, carbonized spots that seem fossilized to your oven floor, you may need a bit more elbow grease. After applying the baking soda paste, use a pumice stone designed for cleaning or a non-scratch scouring pad to gently work on the tough spots before wiping everything out. Never use steel wool or overly abrasive materials that could scratch and damage the oven’s enamel coating.
Keeping It Clean: How to Prevent Future Messes
The easiest way to learn how to clean the bottom of an oven is to not have to do it so often! A little prevention goes a long way.
- Wipe Up Spills Immediately: Once the oven is completely cool, wipe up any spills with a damp cloth. The longer they sit and bake, the harder they are to remove.
- Use a Baking Sheet: When baking pies, casseroles, or anything that might bubble over, place a larger baking sheet on the rack below to catch any drips.
- Consider an Oven Liner: A non-stick, reusable oven liner placed on the lowest rack (not the very bottom floor of the oven, as it can block heat) can make cleanup as simple as washing a dish.
Frequently Asked Questions
Q: How often should I clean the bottom of my oven?
A: A good rule of thumb is to give it a deep clean every 3 to 6 months, or more often if you’re a frequent baker or notice spills. Wiping up messes as they happen is the best way to extend time between deep cleans.
Q: Can I use the baking soda method on a self-cleaning oven?
A: Absolutely! The baking soda and vinegar method is perfectly safe for all oven interiors, including self-cleaning models. It’s a great option when you don’t want to run the full, high-heat self-clean cycle.
Q: What is that smell after I clean my oven?
A: If you used a commercial cleaner, it could be some leftover residue burning off. If you used baking soda and vinegar, it’s likely just a faint vinegar smell that will dissipate quickly. In either case, heating the oven for 15-20 minutes with the kitchen ventilated should clear it out.
Q: Is it safe to use steel wool on the oven bottom?
A: No, you should avoid using steel wool or other harsh abrasives on the interior of your oven. They can permanently scratch the enamel coating, which can lead to rust and make future cleaning much more difficult.
Q: My oven bottom has a heating element. How do I clean around it?
A: For electric ovens with an exposed bottom element, be very gentle. Lift it carefully if possible (check your manual) to clean underneath. If it’s fixed, simply apply your cleaning paste or spray around it, being careful not to soak the electrical connections.
There you have it—your comprehensive guide on how to clean the bottom of an oven. It’s not the most glamorous kitchen task, but the reward of a sparkling clean oven, ready to bring your next culinary masterpiece to life, is well worth it. A clean oven is a testament to a kitchen filled with love and delicious food. Now, go forth and bake with confidence! We’d love to hear your own cleaning tips in the comments below.